Dronedeploy Upload Images Flight Plan Not Completed
SLANTRANGE & DRONEDEPLOY PART 2: MAP UPLOADS
Sharing and syncing your SLANTRANGE information is quick and easy with DroneDeploy!
By Matthew Barre, Director Strategic Evolution at @SLANTRANGE
This mail service originally appeared on the SLANTRANGE Weblog
Office I of our 3-part serial on our partnership with DroneDeploy covered the details of using the DroneDeploy flying planner with a SLANTRANGE sensor. In Function 2, nosotros'll be covering the DroneDeploy Map Upload tool, which allows you to upload completed SLANTRANGE maps to your DroneDeploy account.
SLANTRANGE sensors, coupled with our SlantView analytics software, provide agronomics drone service providers with the unique ability to process all of their imagery within a few minutes of completing a flight and without whatsoever network connectedness or cloud uploads required. This provides some huge advantages in efficiency and operating costs for your drone service provider business organisation and, almost importantly, provides a grower with immediate information about the status of their field. Nonetheless, once a network connection is bachelor, cloud software solutions provide an first-class tool for sharing data with clients, syncing data between devices, and archiving information. This is where the DroneDeploy Map Upload tool provides a perfect solution.
The DroneDeploy Map Upload tool allows you to upload a complete map to your account. Then rather than uploading a set of individual images to be candy past the DroneDeploy Map Engine, a fully processed map tin can be directly uploaded and so used alongside all the other maps in your business relationship. While the DroneDeploy weblog provides a general overview of how to employ the Map Upload tool, nosotros wanted to provide some specific instructions for using the tool with SLANTRANGE data. Below is a step-by-stride guide to easily import your SLANTRANGE maps into DroneDeploy.
Footstep 1: Generate A Map
Plan, wing, and process your data just as you normally would in SlantView. Yous practise not need to use DroneDeploy for flight planning to use the Map Upload tool, however, note the slightly dissimilar process in Stride 3 if you do.
Footstep 2: Consign Your Map
Before you export your map, we highly recommend that y'all crop your map using the SlantView cropping tools. This makes for a cleaner data presentation to your colleagues and clients and also helps brand surrounding reference features in the background map more visible. Our cropping tools are covered in our User Guide. Additionally, our app in the DroneDeploy App Market (to be covered in Office Iii of this serial) allows you to download the boundary from your DroneDeploy flight plan and use information technology in SlantView to crop your map.
SlantView includes a variety of export options to let you to share and import your data with other image processing or farm management software tools that you utilise to support your business. For the DroneDeploy Map Upload tool, you'll demand to export your map as a GeoTIFF.
To do this, display the data layer map you'd like to export in the SlantView Map Window, right-click on the map, and select Export > Maps > Electric current view > GeoTIFF . The Map Upload tool can currently only upload i map at a time and so be sure to select Electric current view; selecting All views will export a multi-page GeoTIFF that tin can not be directly uploaded to DroneDeploy.
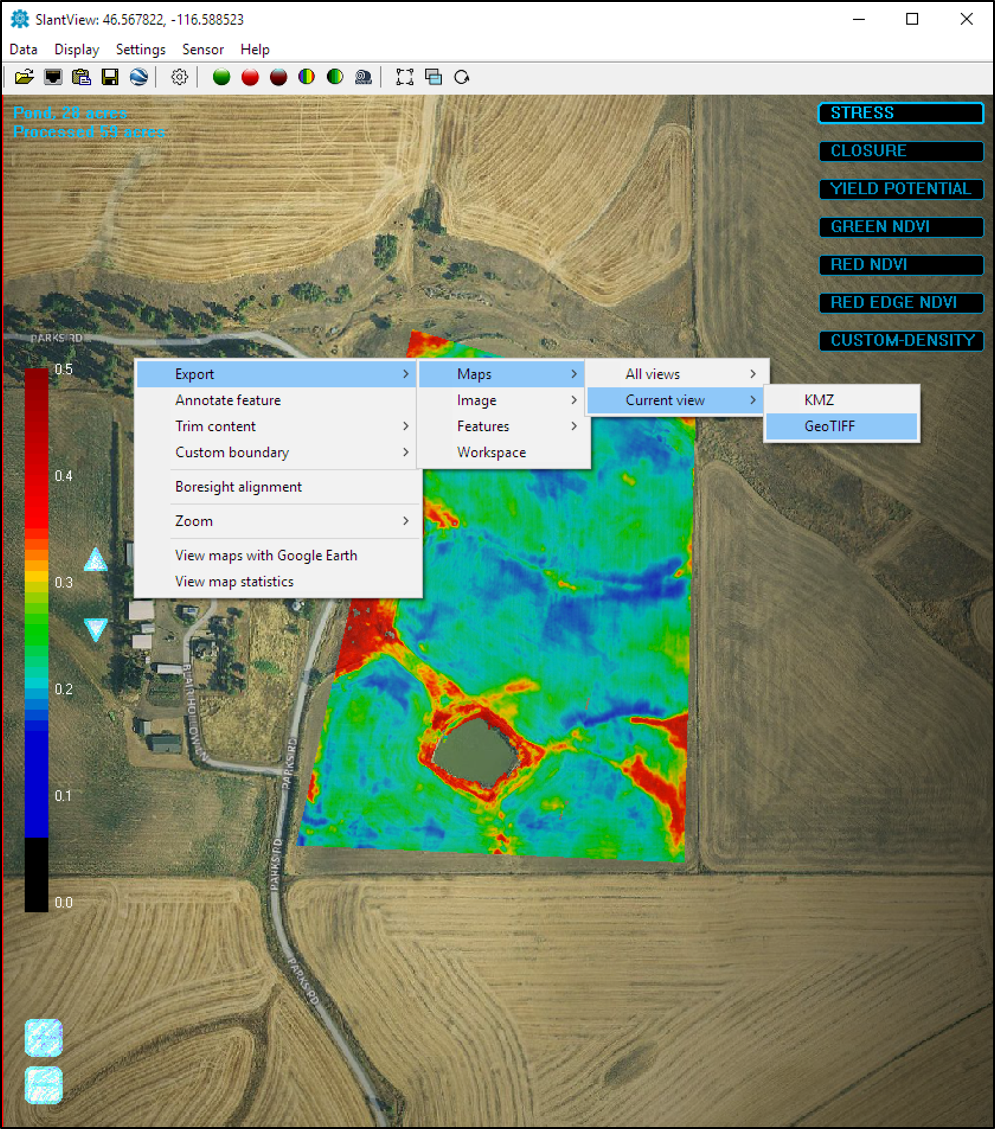
If the Store locally box was checked upon initial processing, SlantView volition save the exported map in a folder named GeoTIFF in C:\SlantRange\Data\[Grower Name]\[Field Proper name]. Otherwise, the GeoTIFF folder will be created in the folder that was selected to load the dataset. If you are not sure where the files are beingness saved, the Image Window Championship Bar displays the path to the active directory.
Step iii: Upload Your Map
From your computer, log into your DroneDeploy account and view your Dashboard.
If you used DroneDeploy to collect the data you'll be uploading, select the Flying Plan y'all used, which should at present have an Upload icon.
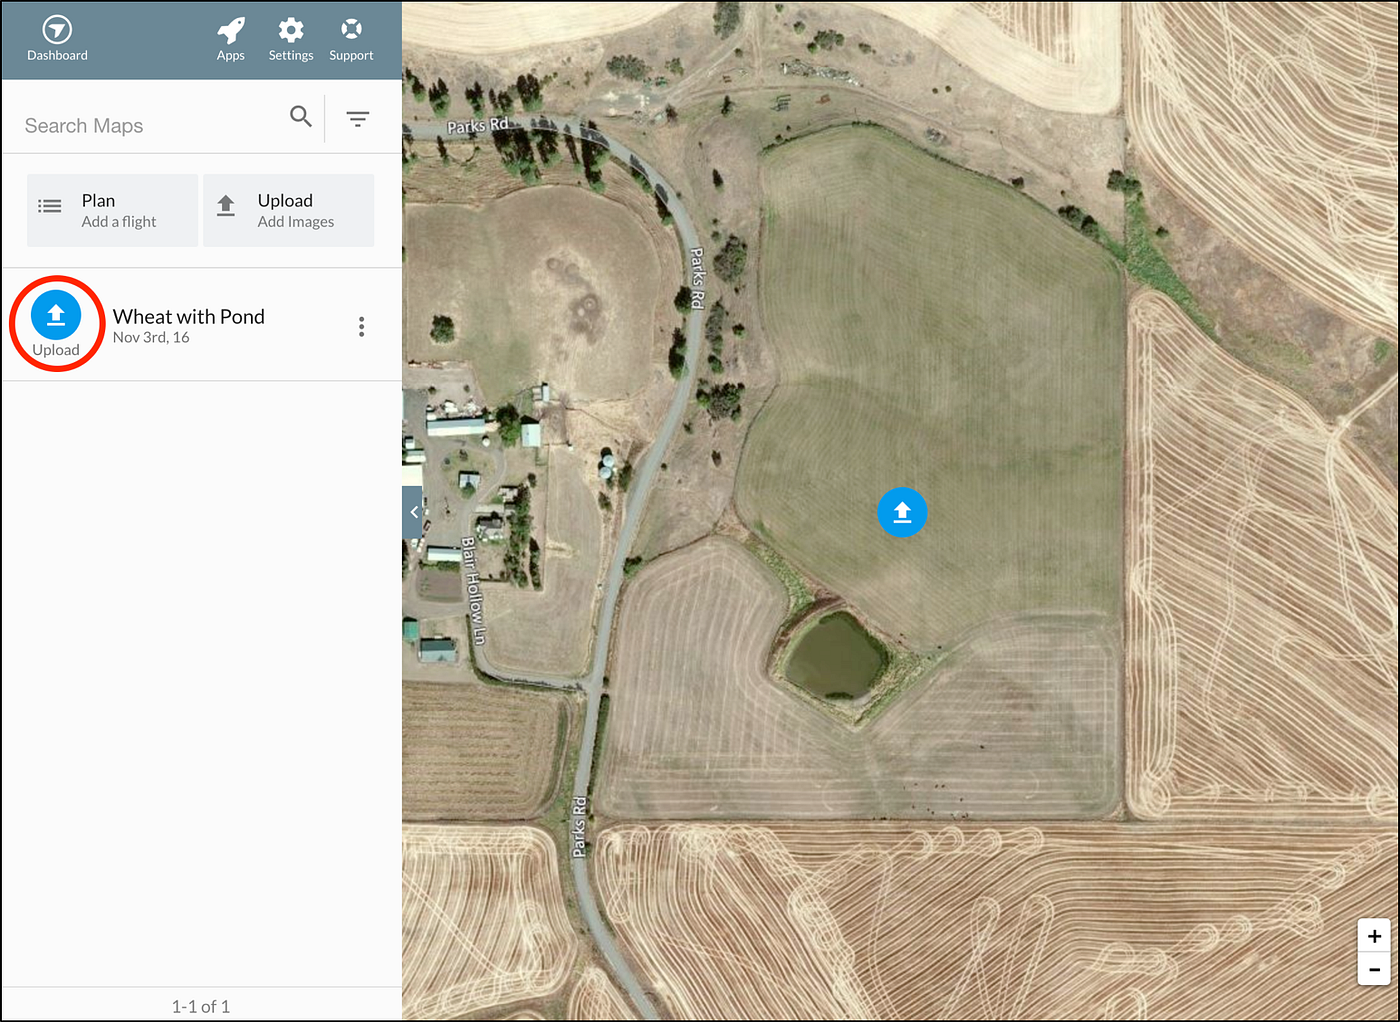
If you lot did not use DroneDeploy to collect the data you'll be uploading, simply click the Upload button at the summit right of your Dashboard.
From the Upload screen, give your map a name and and so select "Upload your GeoTIFF here" at the bottom of the left pane.
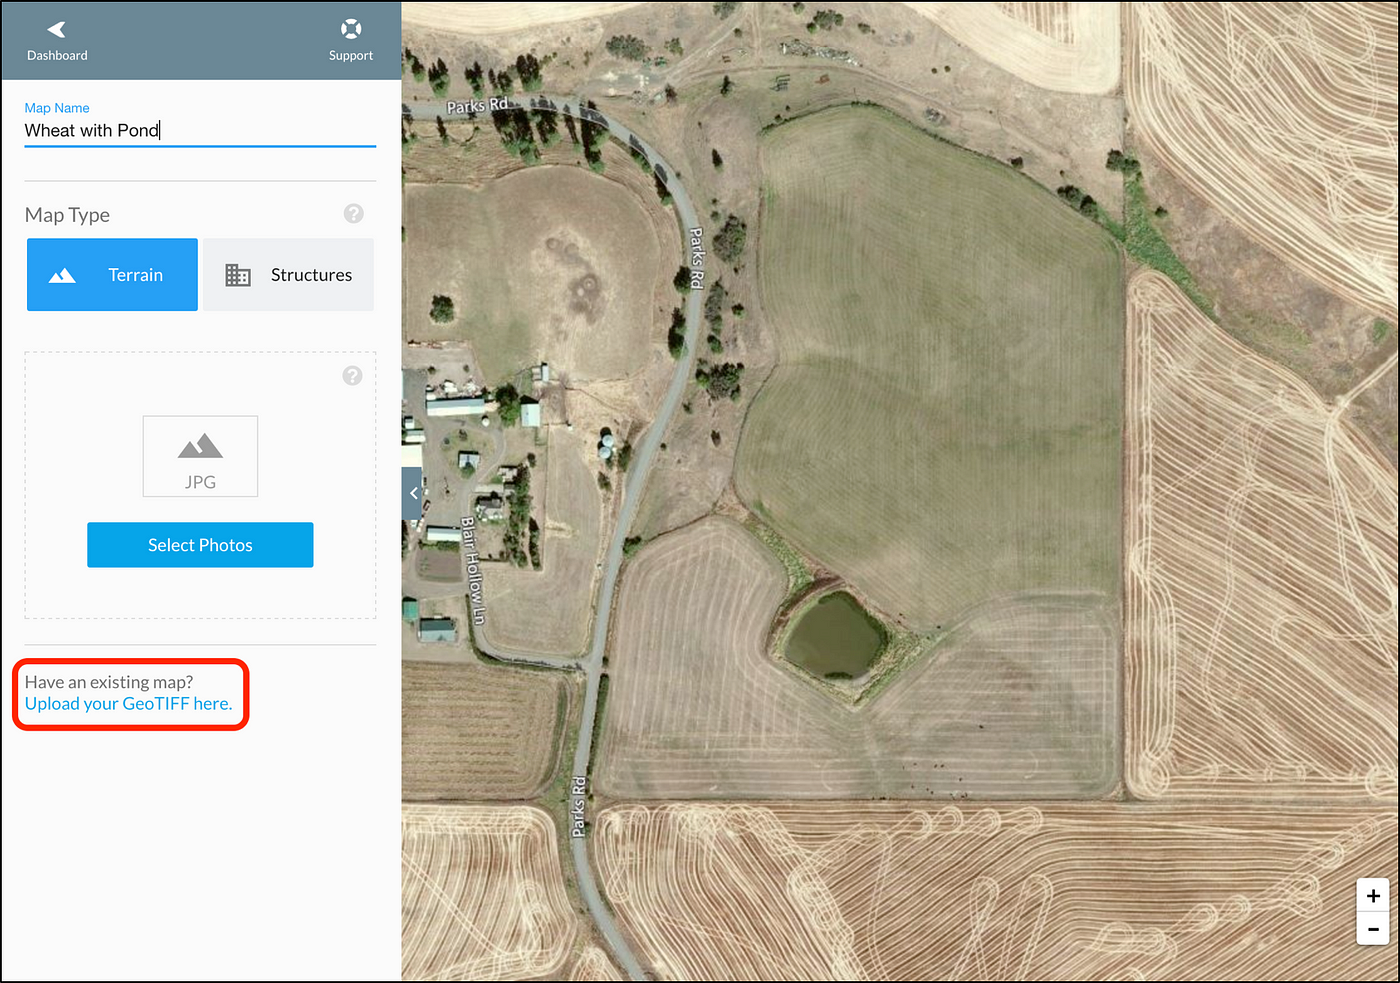
Navigate to the map you exported in Footstep ii and click Open. Once the upload is complete, you will run across a confirmation bulletin at the bottom of the screen.
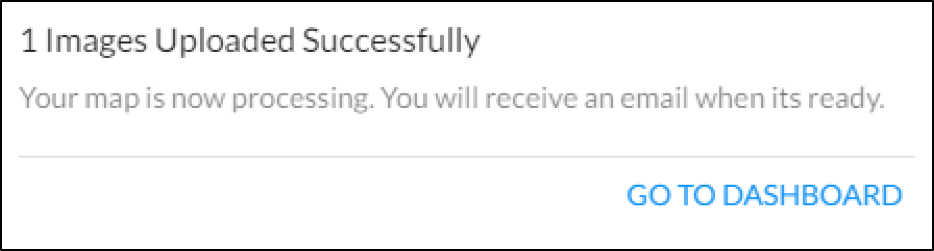
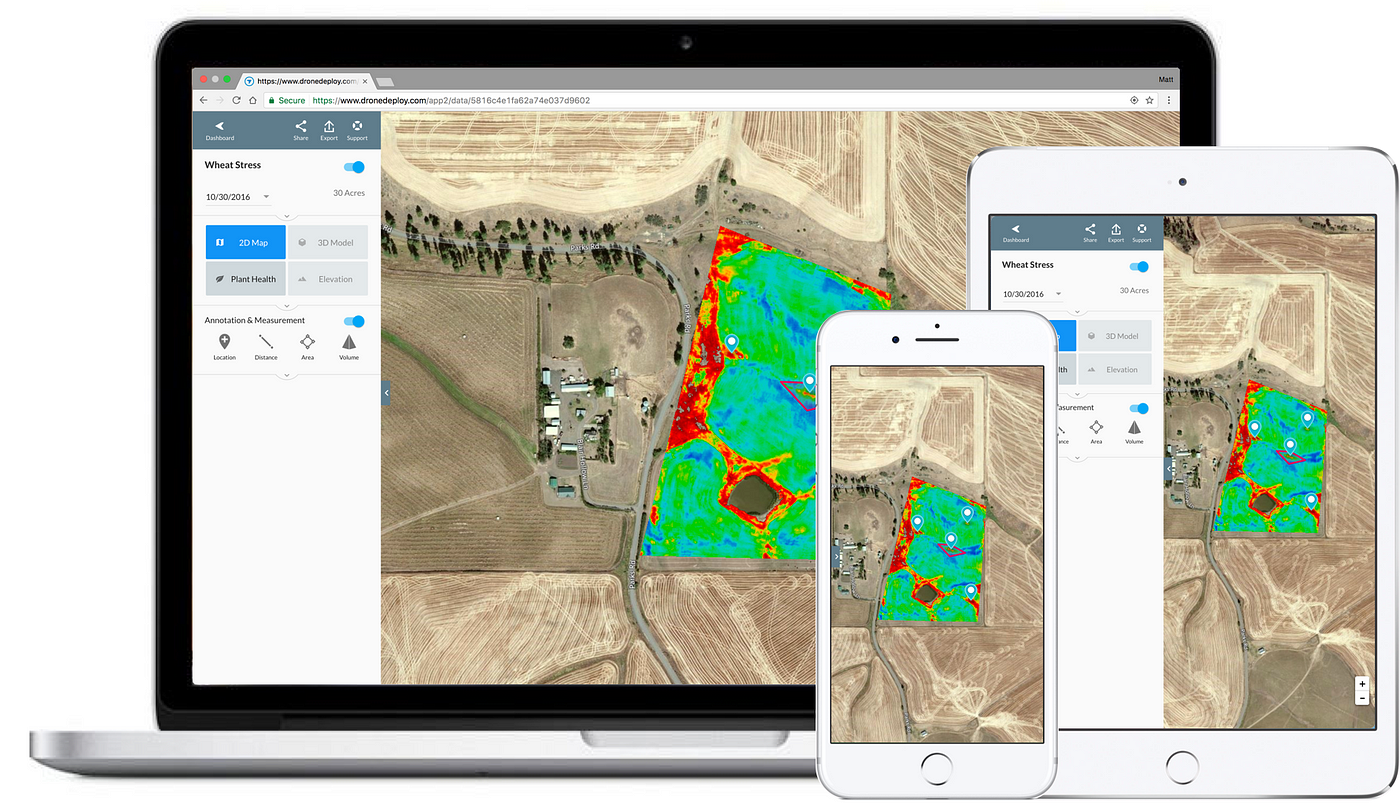
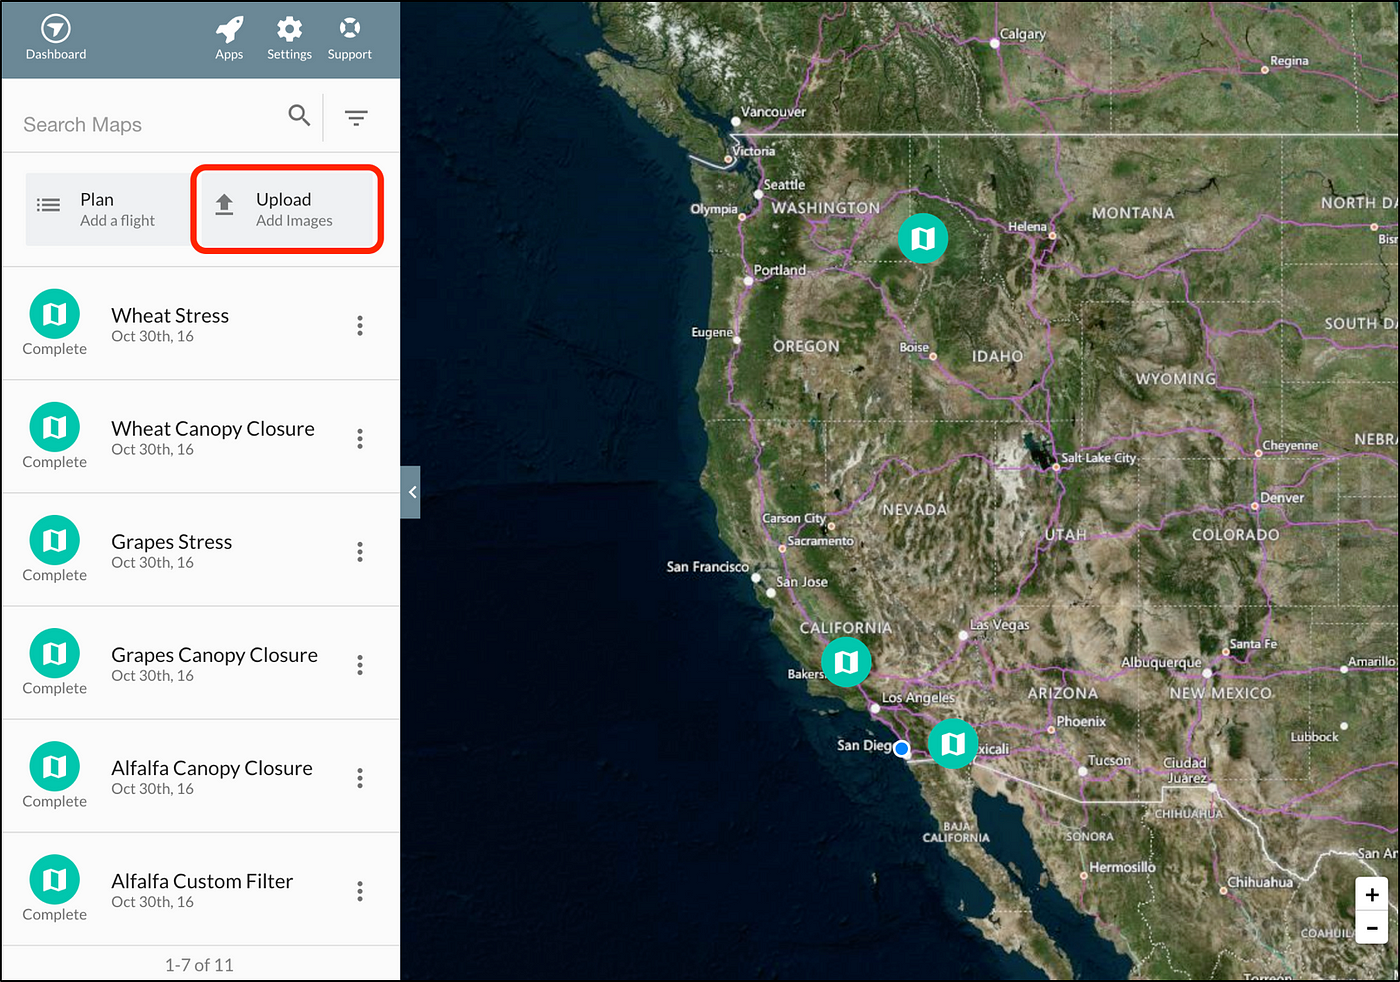
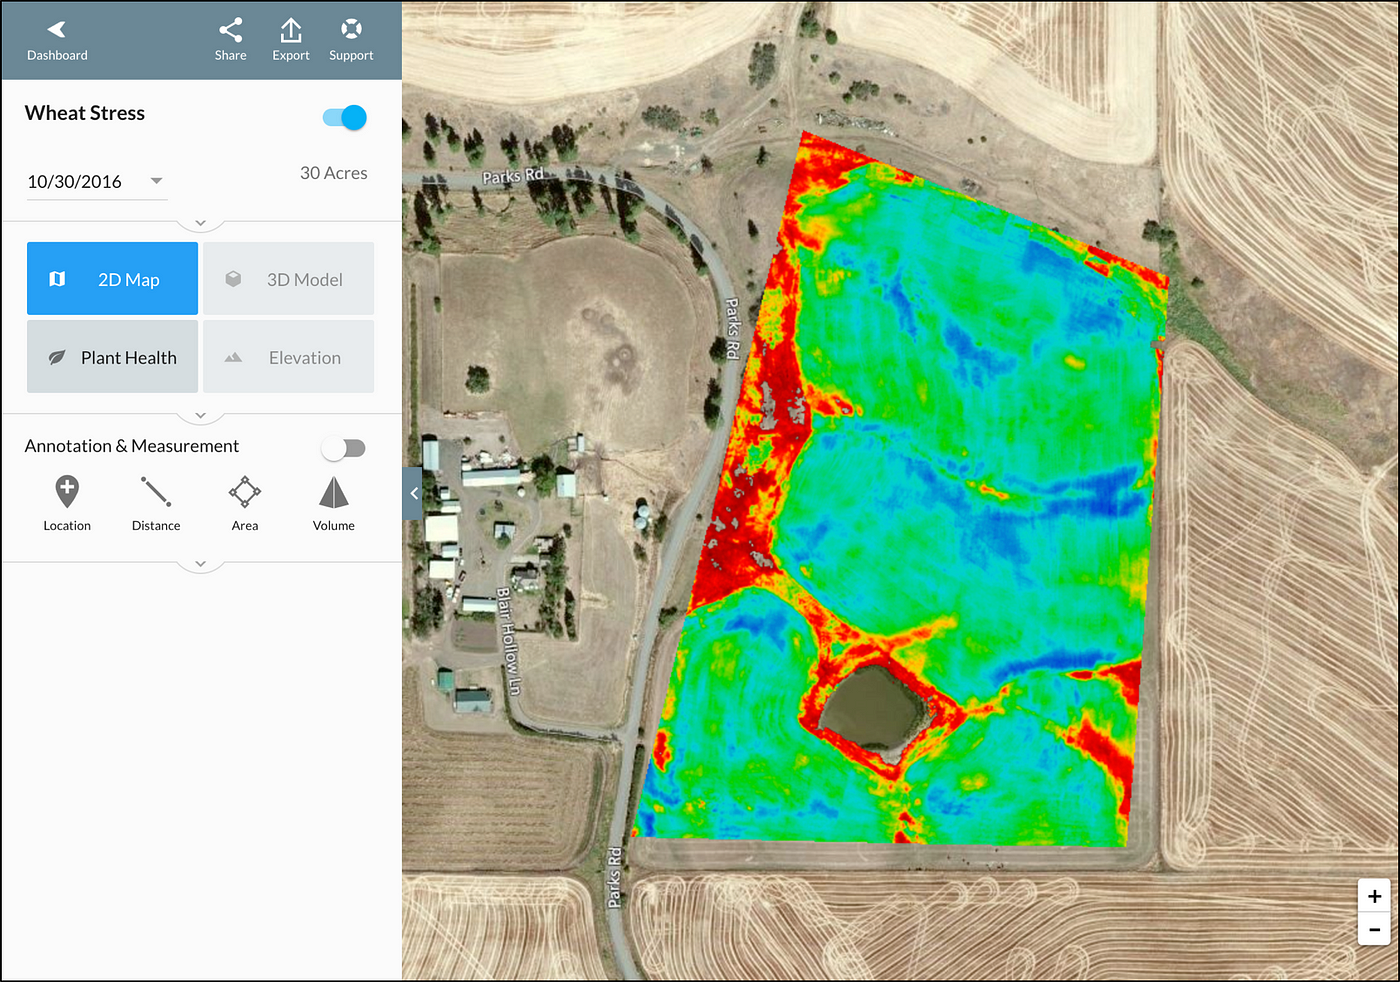
Your map will appear in your Dashboard with a Queued icon. Y'all will receive an email once your map has finished processing and it will then appear in your Dashboard with a Complete map icon. Select the map to brandish your SLANTRANGE data.
Step four: Comment, Share, & Sync
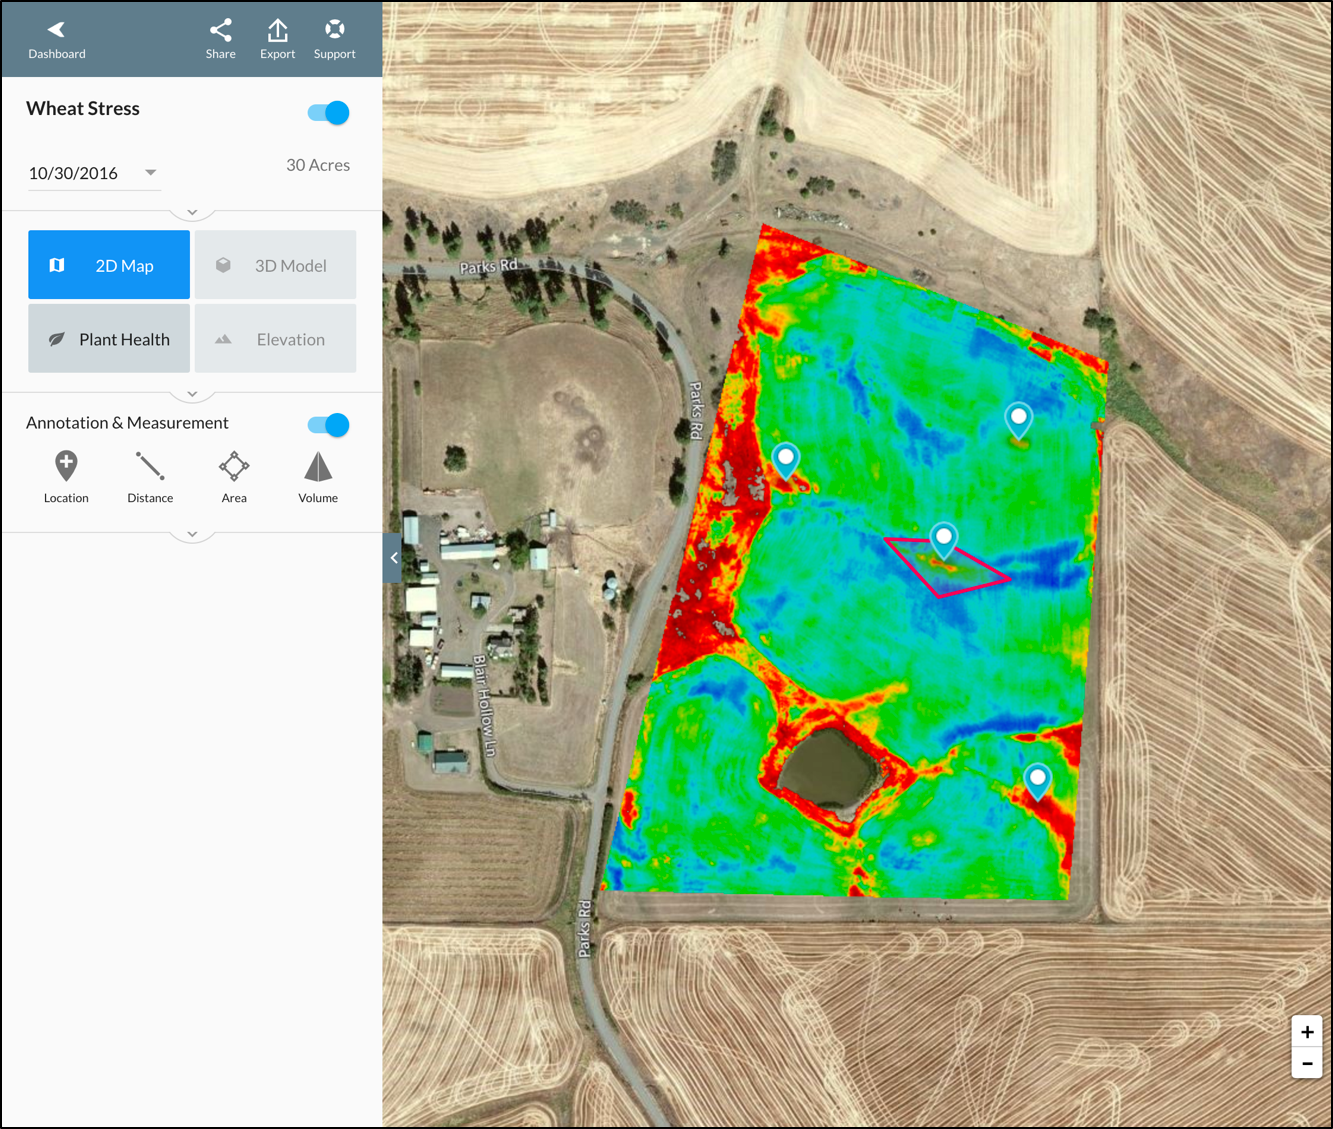
Once the map is available in your DroneDeploy account, you tin use most of the standard tools provided, including:
- The Location tool to mark locations of interest
- The Distance tool to make linear measurements on the map
- The Surface area tool to measure zones in acres or hectares
You lot can easily add comments and photos to each of these features, which will be included when you share the map with your colleagues and clients.
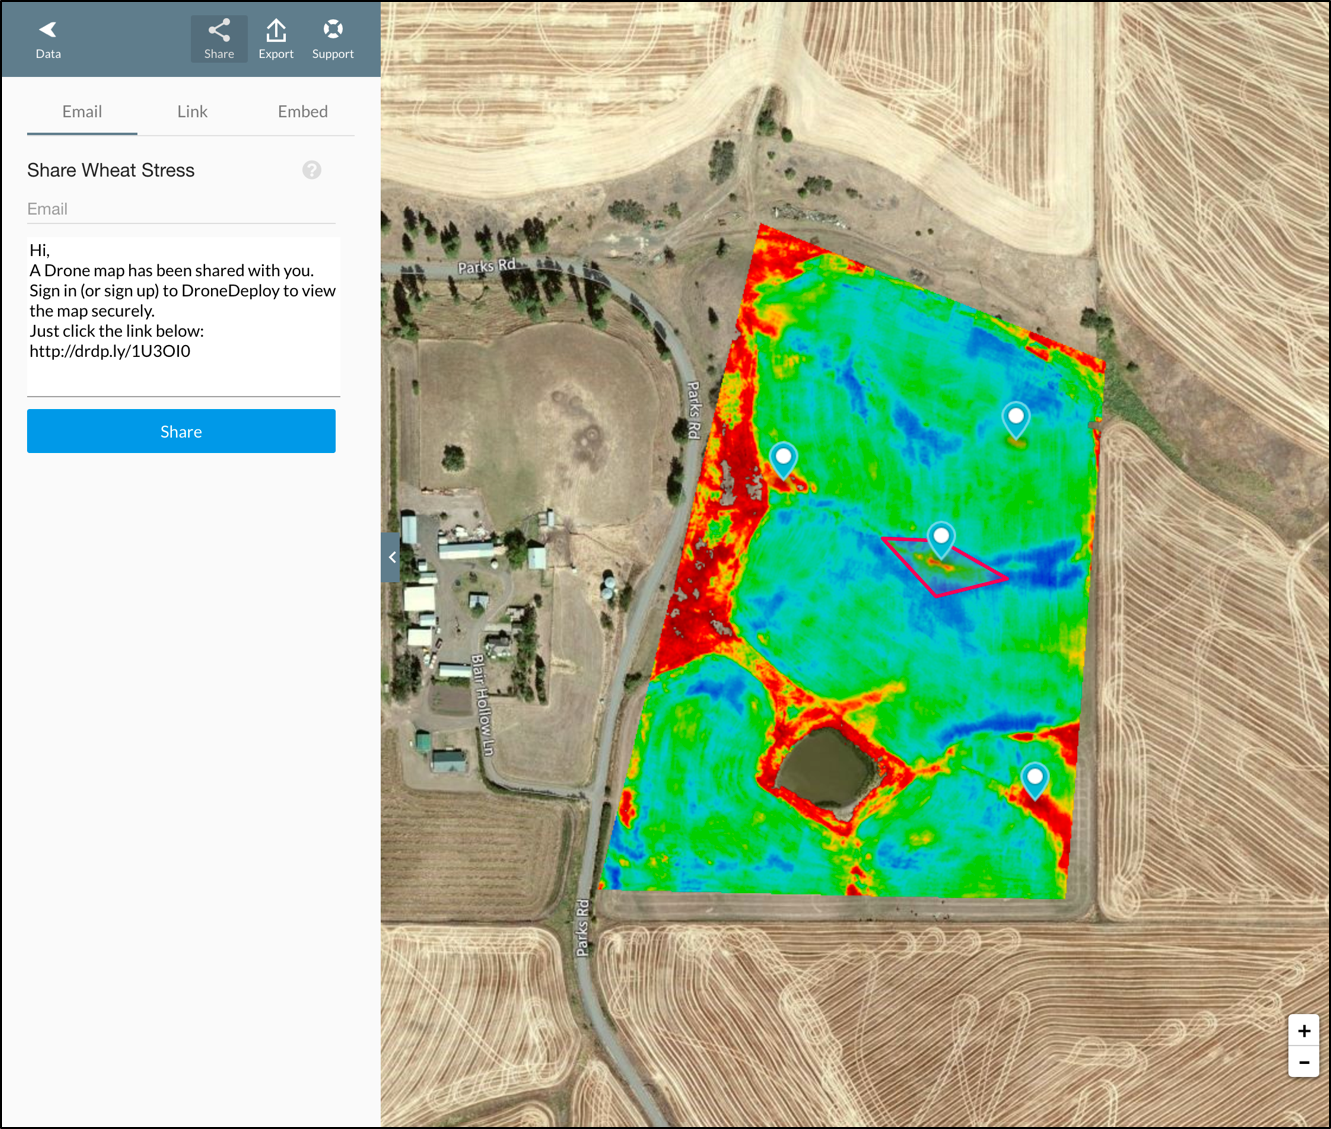
To share a map, but click the Share icon at the pinnacle of the left pane and click:
- Email to ship an email with a link to the map
- Link to copy a link to the map
- Embed to copy the HTML to embed the map on another website
To learn more virtually these features, delight visit the DroneDeploy support pages for Annotations and Data Sharing.
Note that there are some DroneDeploy features that are not supported with imported maps, including 3D Model, Superlative, and Book. The Plant Wellness tools are intended to be used with RGB or Converted RGB imagery and should Non be used with SLANTRANGE maps, which are generated from true multispectral imagery.
All of your SLANTRANGE maps, including annotations, volition automatically be synced across all of your devices so you'll accept easy admission to your information at the office, at home, and in the field.

The DroneDeploy Map Upload tool is a groovy companion to the rapid, local processing provided by SLANTRANGE. These cloud-based tools allow for seamless syncing across your devices and simple one-click sharing to deliver your SLANTRANGE maps to your clients or for collaborating with your colleagues and co-workers. And all of these tools are included in the costless Explorer Plan offered past DroneDeploy.
And while DroneDeploy offers some valuable cloud-based tools, don't forget that our SlantView plans include unlimited installations, which allows your clients to install SlantView to review the data you lot collect in the native software environment, leveraging all of the powerful tools we provide, such equally existent-fourth dimension admission to the original loftier-resolution data and our Smart Detection feature for creating custom spectral filters on-the-fly. SlantView also provides Shapefile and KML exports every bit additional easy options for sharing and aggregating your data.
We hope that our partnership with DroneDeploy gives you some valuable tools to make your agriculture drone service business more than efficient and profitable. Feel gratis to provide any feedback in the Comments section.
Keep an centre out for Part 3 of this series where we'll provide a walkthrough of our app in the DroneDeploy App Market. Be sure to subscribe to the SLANTRANGE blog for all the latest updates.
Source: https://medium.com/aerial-acuity/slantrange-dronedeploy-part-ii-map-uploads-b9e33e72987
0 Response to "Dronedeploy Upload Images Flight Plan Not Completed"
Post a Comment